There are ways to buy more storage for your iPhone without using iCloud (and adding to your monthly bills). In fact, you can buy extra memory for your iPhone or iPad for under $50!

Buy More Storage for your iPhone for under $50!
If you need more storage for your iPhone (but don’t want to pay for the iCloud each month) you can just buy an external storage drive for your iPhone or iPad.
After researching the different options I chose to go with the SanDisk iXpand drive and have been really happy with my decision. In fact, after seeing my iXpand a lot of friends and family have either bought these external iPhone drives for themselves or expressed interest in having their own for different uses (prompting me to buy them as a gift). 🙂
What is the SanDisk iXpand Drive?
The SanDisk iXpand drive is basically a flash drive (USB stick, thumb drive, whatever you call it) that is compatible with both your iPhone and your computer. It’s an external storage drive for your iPhone (or iPad) that can be used to backup your phone, share files to and from your phone and store extra content so it doesn’t take up space on your phone.
How Does the iXpand Drive Work?
The iXpand drive is a flash drive that has a USB connection on one end. The other end of the drive has a connection that fits into the lightning charging port on your iPhone, iPad or iPod touch. With both connections the device can be put into an iPhone, items saved on it and then it can be put into the USB drive on your computer. The SanDisk iXpand drive is a perfect option to buy more storage for your iphone.

What are the Sizes?
There are different sized iXpand drives. Just like with other USB drives and with your iPhone, the ones with more GB will hold more pictures, videos, songs, etc and the ones with less GB will hold less. Right now with 32GB, 64GB, 128GB and 256GB version there are plenty options to buy more storage for your iphone.
How to Use an iXpand Flash Drive (and 5 Great Uses for One!)
There are so many uses for this little gadget. So, even though you may have set out to buy more storage for your iphone you’ll find you can do a lot with this iPhone flash drive. Here we’ll list some of them with simple instructions on how to do each task.
Note: If you’re just getting started with the drive you’ll want to jump to the section below: How to Setup the SanDisk iXpand Drive.
Use #1 – Make Space when your iPhone Storage is Full
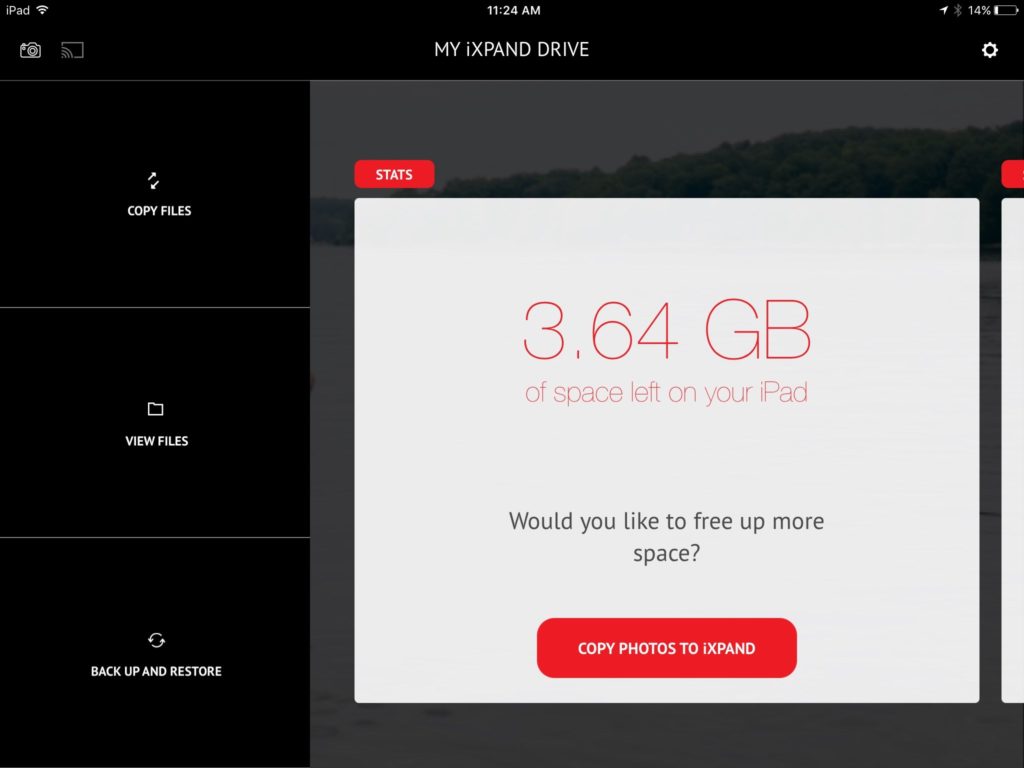
SanDisk has provided us a way to buy more storage for your iPhone or iPad with this flash drive! Possibly the most helpful use of this external drive is to make room on your iPhone when you get the dreaded “storage is full” message.
- Plug in the iXpand drive into the lightning charging port on your iPhone and click allow on the window that opens
- When the app opens, click on copy files
- Tap on copy photos from phone
- You now have the option to copy all pictures and videos to the flash drive or copy only selected photos. To make space on the iPhone we’re going to copy them all to the thumb drive. In the upper right corner tap select all. All the pictures and videos will show a blue check mark on them.
- Press the red copy to iXpand drive button at the bottom of the screen
- Select the folder (on the drive) that you’d like to keep the pictures in. To create a new folder click create new folder and give it a name. I like to name my folders something like ‘All iPhone Pictures – date’. Having the date in the name helps me find pictures if I’m looking for them.
- After you’ve selected the folder you want to copy them to, click copy here.
- The pictures and videos will now be copied to the iXpand drive. When it’s done you’ll get a message saying the copying is finished and it will ask if you want to delete the picture from your phone. To make room on your iPhone click delete, then confirm it by clicking delete a second time and they will all be deleted from your phone.
- You’ll then get a message showing how much space you freed up on your iPhone! 🙂
Also see our ultimate guide on how to free up space on an iPhone or iPad.
Use #2 – Bring Movies and Shows to Watch on a Long Trip
Another great use for the iXpand drive is to store extra videos on it for watching during long car trips or flights.
If you’ll be sitting in the car or an airplane for a long time it’s nice to have some movies or TV shows to watch on your iPad (or iPhone if you’re up for watching on that small screen).
But, watching movies off of YouTube, Netflix, Amazon or your favorite service will probably use cell phone data and could result in a costly cell phone bill. (In our post on cell phone data we explain what data is, when you’re using it and show you a great way to keep track of it.)
So, instead of watching movies online you could download YouTube videos or Amazon and Netflix now offer options to download some of their movies and shows for watching offline. But, if you don’t have much room on your iPhone or iPad, this may not be a good option either.
That’s where the iXpand drive comes in. You can download movies and shows, save them on the flash drive, and watch them from the drive.
There are so many places you can download movies from (Netflix, Amazon Prime, YouTube, etc.) and shows and many ways to do it (on your device, on a computer, etc). So, rather than give you specific instructions we’ll walk you through the general steps you’ll need to accomplish this:
How to Save Movies on iXpand drive for a long trip:
Option #1
- Download the movies (from your favorite service) onto your computer
- Put your iXpand into your computer’s USB port
- Use windows explorer (or similar program) to copy the movies onto your iXpand drive
- Unplug the iXpand drive from your computer
Option #2
- Download the movies (from your favorite service) onto your iPad or iPhone
- Plug the iXpand into your iPad or iPhone
- Open the iXpand app
- Tap copy files
- Click copy photos from phone
- At the bottom of the screen tap albums
- Tap on the videos folder
- Select the videos you want to save to your iXpand drive and click copy
- When they’ve finished copying click delete from iPad or iPhone to make more storage room on your device
To Watch Movies Stored on your iXpand drive on your iPad or iPhone:
- Plug the iXpand into your iPad
- Open the iXpand app
- Click view files
- Find the folder where your movies are stored
- Tap on the movie you want to watch and enjoy!
Use #3 – Automatically Backup Photos
Let’s say you want to have a backup of your pictures that are stored on your iPhone. I mean imagine you dropped your phone into a pool tomorrow and all your pictures on your phone were lost. How much would you lose? A lot of good memories, right?
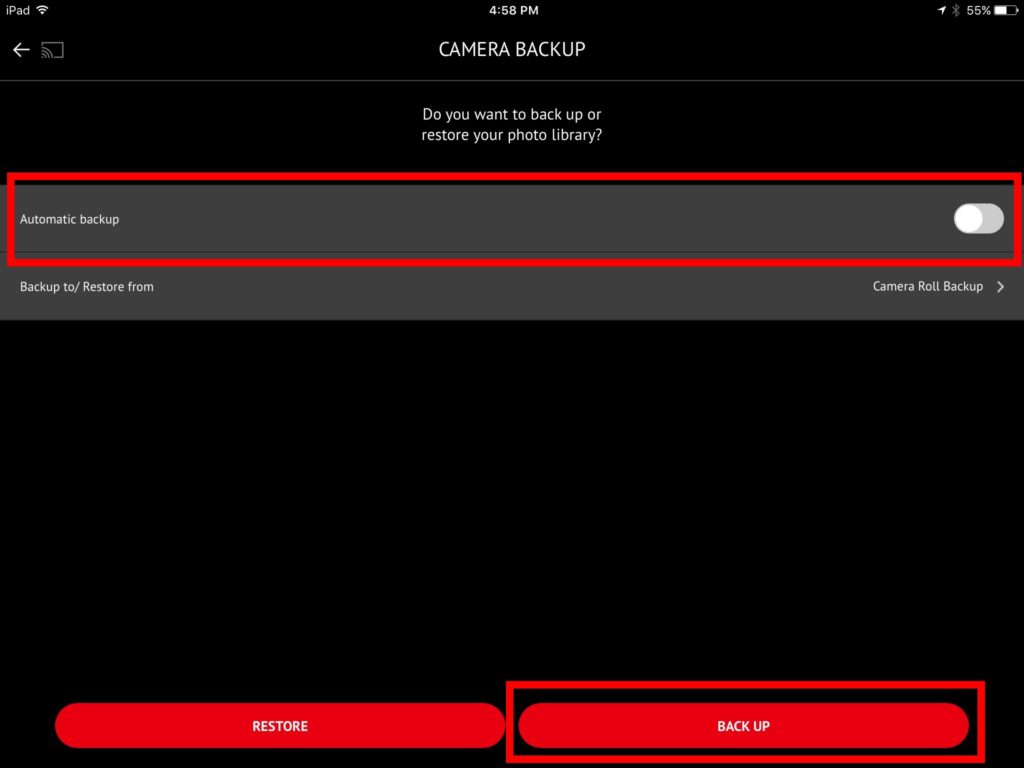
The iXpand drive and its app have the ability to automatically backup the pictures and videos from your iPhone’s camera roll. It will save a copy of these pictures in a folder called camera backup on the drive.
To set up the automatic picture backup on the iXpand drive:
- Plug the iXpand into the iPhone.
- Click allow to open the iXpand app.
- Click backup and restore.
- Tap backup and restore photo library.
- Tap the toggle switch next to automatic backup so it’s green.
- The app will ask if it can access your photos, click allow.
- Click back up.
- The photos will now be backed up to the drive.
- When the photos are all saved on the drive the app will ask if you want to delete them from the phone or keep them on the phone. You can choose whichever makes sense for you.
- Remove the drive.
- Now, next time you inert the drive into your phone the app will know which pictures have already been backed up and which haven’t. It will then copy the new pictures over to the drive so it has a backup of everything.
Use #4 – Share Photos with Others
There are many options for sharing photos and videos with others. You can use a shared iCloud library, send them via text or email or airdrop them. (Read more about airdrop in our airdrop tutorial. It’s a really useful iOS tool most people don’t even know about!)
But, if you want to share a lot of pictures or videos it might be easier to use the iXpand drive to share them with someone else. You can copy pictures or videos from your iPhone onto the flash drive and then your friend can put the flash drive in their iPhone to save a copy of the pictures on their phone. Or, they could put the USB end of the drive into a computer to save the pictures onto their computer.
How to share pictures and videos with others using the iXpand flash drive:
- Follow the instructions in section 1 above to copy pictures from your phone to your drive
- If your friend wants to copy the pictures onto their phone they should then:
- Put the iXpand in their phone
- Open the SanDisk iXpand app
- Click on copy files
- Click copy files from iXpand drive
- Find the folder where you saved the pictures
- Select the pictures they want one by one by tapping on them or press select all at the top right
- Press copy to iPhone at the bottom of the screen
- The pictures will be saved to their photo library and a message will appear when they’re done saving
- If your friend wants to copy the pictures onto their computer they should:
- Put the iXpand drive into the USB port on their computer
- Press Windows plus E to open windows explorer
- Click my computer in the left side of the window
- Find and double click the iXpand drive in the right side of the window (probably drive D or E)
- Find the folder where you saved the pictures
- Press the control key and the letter A to select all the pictures
- Press the control key and the letter C to copy the pictures
- On the left side of the window find the folder where they want to save the pictures and double click to open in
- On the right side of the screen press the control key and the letter V to paste the picures in their folder
- The pictures will then be copied onto their computer (and they will still remain on the iXpand drive for you)
Use #5 – Copy Pictures to your Computer
If you like keeping all your digital pictures on your computer like i do then this iXpand drive can help you do that easily. (Check out an easy way to organize digital pictures on your computer.)
To copy your pictures to a computer using the iXpand drive:
- Follow the instructions in section 1 above to copy pictures from your phone to your drive
- Unplug your iXpand drive from your phone and plug the USB end into your computer
- On your computer, open windows explorer by pressing the windows key and E at the same time (helpful list of windows shortcuts)
- On the left side of the screen click my computer
- Then, on the right side, you’ll see different drives and folders on your computer; The iXpand drive will show up and will probably be labeled with the letter D or E; Double click on the iXpand drive to open it and see what’s inside
- Find the folder that you saved your pictures in and double click it
- Next press the control key and the letter A at the same time to select all of the pictures
- Once all the pictures are selected press the control key and the letter X to cut the pictures (cut is like copy except that after it copies the files to a new location it also removes them from the original location)
- Now, using the locations on the left side of windows explorer, find and click on the folder on your computer where you keep your pictures
- When your picture folder opens up on the right side of the windows explorer screen right click anywhere in the right side of the screen and select paste from the menu
- All your photos will now be saved on your computer and they will be deleted from your iXpand drive so it has room for next time you want to copy your iPhone pictures to your computer!
How to Set Up the SanDisk iXpand Drive
Setup for the SanDisk iXpand flash drive is easy. When you first plug in the flash drive your phone will prompt you to add the corresponding app. From there, the app walks you through most anything you want to do.
If you want specific instructions for getting started, follow the steps below.
To set up the SanDisk iXpand iPhone Flash Drive the first time you put it in your iPhone:
- Unpack the iXpand drive and insert it into the lightning charging port of your iPhone. (The iXpand should fit in the iPhone, even with most cases installed. The USB part of the drive will wrap around the back of the iPhone.)
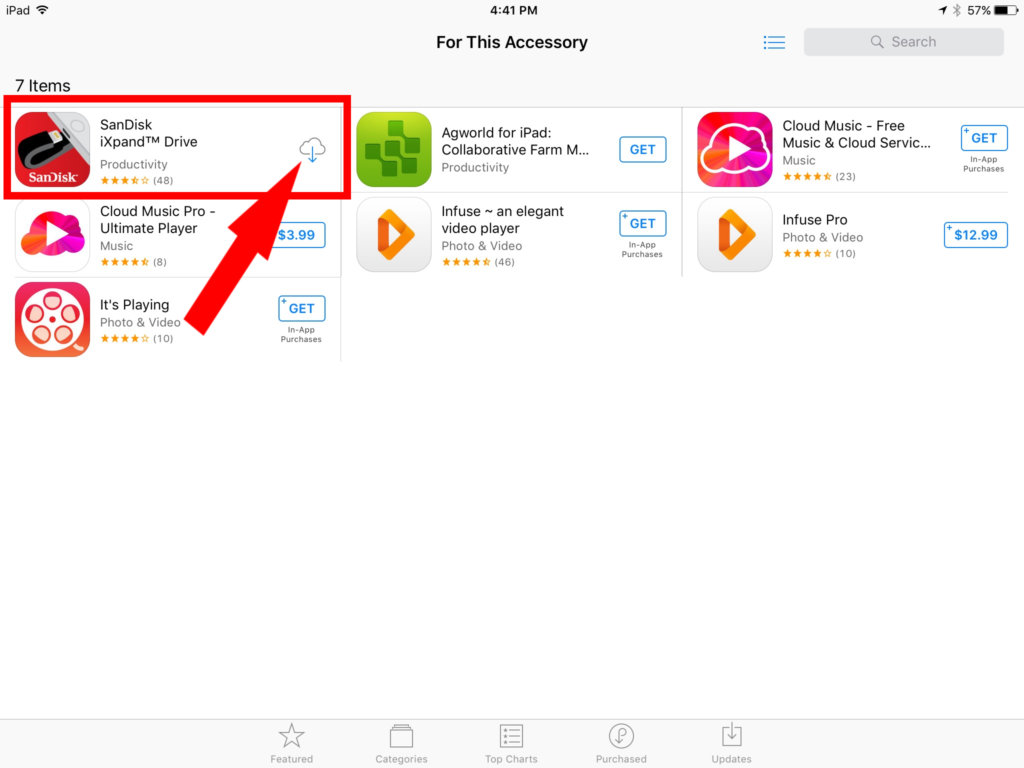
- A notification will pop up on your phone saying App Not Installed, click app store to go to the store and get the free app for the iXpand drive
- In the app store find the app that’s called SanDisk iXpand Drive. Click get and enter your app store password when asked. The app will now be installed on your phone.
- When the app has finished installing, click open.
- When the app opens you have the options to “take a tour” and it will walk you through the different features of the app (and the iXpand drive). If you want to, go ahead and take the tour. When you’re ready to setup your drive, click set up my iXpand drive.
- The app will walk you through different ways you can use the drive. If you want to use any of the backup features follow the instructions on the app to set them up. Or, click skip for now to get to the main app homepage.
- You’ll then see some screens which show new features of the app (as they add them all the time). Click next and then click okay! I got it.
- You’ll now get to the app’s home screen and can use any of the instructions above to perform different tasks using your drive.
In Summary
If you’re looking to buy more storage for your iPhone or iPad the SanDisk iXpand drive is a perfect option. It allows you flexibility of have more space on your iPhone with no recurring costs (like the iCloud). Use the drive to backup your pictures or contacts on your iPhone, free up space on your iPhone, save extra movies and shows to watch on your iPad on a long car trip or flight, save extra music without taking up space on your phone, share content with others and more!